How To Screenshot On Iphone Se: Capturing Your Screen Like A Pro In Minutes
Have you ever wanted to capture something on your iPhone SE screen but didn’t know how? Well, look no further because we’ve got you covered! In this article, we’ll show you how to screenshot on your iPhone SE like a pro in just a few minutes.
Whether you want to save a funny text conversation, capture a memorable moment in a game, or share important information with others, learning how to take a screenshot is a valuable skill.
We’ll guide you through the step-by-step process of capturing your screen on the iPhone SE, saving and managing your screenshots, and even customizing your screenshot settings. Plus, we’ll help you troubleshoot any common issues you may encounter along the way.
So grab your iPhone SE and get ready to become a screenshot pro in no time!
Key Takeaways
- The screenshot on iPhone SE can be taken by pressing the power button and the home button simultaneously.
- The captured screenshot is automatically saved in the Photos app.
- To manage and organize the screenshots, users can tap on the thumbnail and select various options.
- Sharing the screenshots with others is made easy with the share button.
Understanding the Screen Capture Functionality on iPhone SE
So, you’re eager to learn how to take screenshots on your iPhone SE and capture your screen like a pro in just a few minutes. Well, let’s start by understanding the screen capture functionality on your device.
Taking a screenshot on your iPhone SE is incredibly easy. All you need to do is simultaneously press the power button and the home button. When you press these two buttons together, you’ll see a quick flash on your screen, indicating that the screenshot has been successfully captured.
The screenshot will then be saved in your Photos app, where you can access it anytime you want. It’s a simple and convenient way to capture and save any important information, memorable moments, or even funny conversations.
So, go ahead and start capturing your screen like a pro!
Step-by-Step Guide to Taking a Screenshot on iPhone SE
To easily capture an image of your iPhone SE’s display, follow this step-by-step guide for a seamless screenshot experience.
First, locate the content you want to capture on your iPhone SE screen. It could be a text conversation, a funny meme, or anything else you want to save.
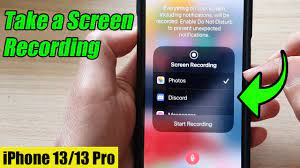
Next, simultaneously press the Side button (formerly known as the Sleep/Wake button) located on the right side of your device, and the Volume Up button on the left side. You’ll see a quick flash, indicating that the screenshot has been successfully taken.
The screenshot will then appear as a thumbnail in the bottom left corner of your screen. Tap on it to edit, annotate, or share it immediately. It’s that simple!
Saving and Managing Screenshots on iPhone SE
Once you’ve snapped a screenshot on your iPhone SE, learn how to easily save and manage them with just a few simple steps. To save a screenshot, simply tap on the thumbnail that appears in the bottom left corner of your screen right after you’ve taken the screenshot. This will open the screenshot in full-screen mode. From there, tap on the ‘Done’ button located at the top left corner of your screen. You’ll then be given the option to either save the screenshot to your Photos app or delete it.
To manage your screenshots, go to the Photos app and tap on the ‘Albums’ tab at the bottom. Scroll down and tap on the ‘Screenshots’ album to view all your saved screenshots. From here, you can easily organize, share, or delete your screenshots as needed.
Managing your screenshots on the iPhone SE is a breeze!
Sharing Screenshots with Others
Don’t forget to easily share your screenshots with others by using the share button in the top right corner of your screen. Once you’ve taken a screenshot on your iPhone SE, simply tap on the share button.
This will open a list of options for sharing your screenshot. You can choose to send it via text message, email, or even post it on social media platforms like Facebook or Twitter. Additionally, you can also save the screenshot to your photo library or other cloud storage services like iCloud or Google Drive.
Sharing screenshots is a great way to quickly show others what you’re seeing on your screen, whether it’s a funny meme, important information, or a beautiful photo.
So go ahead and share away!
Customizing Screenshot Settings on iPhone SE
Make sure you take advantage of the customizable screenshot settings on your iPhone SE to enhance your sharing experience. With these settings, you can easily customize how your screenshots are saved and organized.
To access the screenshot settings, go to Settings on your iPhone SE, then scroll down and tap on ‘Photos.’ From there, you can choose whether to save your screenshots in the All Photos album or create a separate album just for screenshots. You can also enable or disable the ‘Keep Normal Photo’ option, which allows you to save both the original screenshot and an edited version if you make any changes.
Additionally, you can choose the format in which your screenshots are saved, either as PNG or JPEG. By customizing these settings, you can ensure that your screenshots are organized and saved exactly how you want them.
Troubleshooting Common Issues with Screenshots on iPhone SE
Having trouble with screenshots on your iPhone SE? Let’s troubleshoot some common issues together.
If you’re finding that your screenshots are not saving to your Photos app, try restarting your iPhone SE. This simple step can often resolve any temporary glitches that may be causing the issue.
Another common problem is when your iPhone SE’s storage is full, which can prevent screenshots from being saved. In this case, you can free up some space by deleting unnecessary files or apps.
If your screenshots appear blurry or distorted, ensure that you’re pressing the home button and the power button simultaneously, as this is the correct method to capture a screenshot on the iPhone SE.
By following these troubleshooting steps, you’ll be capturing flawless screenshots like a pro in no time.
Frequently Asked Questions
Yes, you can easily edit the screenshots you take on your iPhone SE. Simply open the screenshot in the Photos app, tap “Edit” and use the various tools to crop, annotate, or add filters to your screenshot.
To take a screenshot of a specific portion of the screen on your iPhone SE, press and hold the Side button and the Volume Up button at the same time. Release them quickly, and a preview of the screenshot will appear.
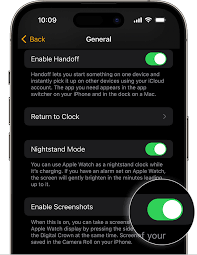
Yes, it is possible to take a screenshot on your iPhone SE without using the physical buttons. Simply go to Settings > Accessibility > Touch > AssistiveTouch, then enable the “Screenshot” option.
Yes, you can take a screenshot while watching a video or playing a game on your iPhone SE. Simply press the side button and the volume up button simultaneously, and the screenshot will be captured.
To organize your screenshots on iPhone SE, you can create folders or albums. Simply go to the Photos app, select the screenshots you want to organize, tap “Add To” and choose either a new album or an existing one.
Conclusion
In conclusion, capturing screenshots on your iPhone SE is a breeze. With just a few simple steps, you can save important information, share funny moments, or troubleshoot issues. The screen capture functionality on the iPhone SE has got you covered. You can easily save and manage your screenshots, customize settings, and share them with others. You’ll be screenshotting like a pro in no time. So go ahead and start capturing those memorable moments with your iPhone SE!