How To Screen Record On Iphone 13: Capture Your Moments With Ease
Want to capture and share your favorite moments on your iPhone 13? With the screen recording feature, you can easily document and save anything happening on your device’s screen. Whether it’s a gameplay session, a video call, or a tutorial, screen recording allows you to create high-quality videos that you can edit and share with ease.
In this article, we will guide you through the process of enabling screen recording on your iPhone 13, accessing the screen recording controls, adjusting settings for optimal recording, starting and stopping a screen recording, and editing and sharing your recorded content. We will also provide you with some tips and tricks to ensure a seamless screen recording experience.
So, get ready to capture your moments in the most convenient way possible with your iPhone 13!
Key Takeaways
- iPhone 13 has a built-in screen recording feature
- Users can customize settings for optimal recording experience
- Recorded content can be edited and personalized in the Photos app
- Videos can be easily shared through various platforms or saved to the camera roll
Enabling Screen Recording on Your iPhone 13
Now it’s time to unleash the screen recording capabilities of your new iPhone 13 – let’s dive in and see how you can enable this awesome feature!
To start screen recording on your iPhone 13, go to the Control Center. You can access it by swiping down from the top right corner of your screen. Look for the ‘Screen Recording’ button, which looks like a circle inside another circle. Tap on it to enable screen recording.
A countdown timer will appear, giving you a few seconds to prepare. Once the timer reaches zero, your iPhone 13 will start recording everything on your screen.
To stop the recording, simply tap on the red status bar at the top of your screen and confirm by tapping ‘Stop’ on the pop-up menu.
Now you’re all set to capture your favorite moments with ease using the screen recording feature on your iPhone 13!
Accessing the Screen Recording Controls
To access the controls, simply swipe down from the top right corner of your device to reveal the menu bar. Once the menu bar appears, you will see a series of icons, including the screen recording icon. It looks like a small circle surrounded by a larger circle. Tap on this icon to access the screen recording controls.
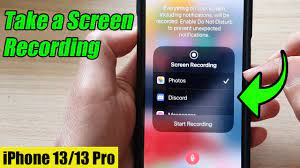
A pop-up window will appear, giving you the option to start recording your screen. You can also enable or disable microphone audio during the recording by tapping on the microphone icon. Once you have made your desired selections, simply tap on the ‘Start Recording’ button.
The screen recording will begin after a three-second countdown, and you can easily stop the recording by tapping on the red status bar at the top of your screen.
Adjusting Settings for Optimal Recording
For the best recording experience, make sure you customize the settings to capture every detail and create memorable videos on your device. Start by accessing the Control Center and tapping the screen recording icon.
Once you’re in the screen recording controls, you can adjust various settings to optimize your recording. Firstly, choose whether you want to record audio from your device’s microphone or not. This is especially useful when you want to add commentary or capture the sound of a game you’re playing.
Additionally, you can enable or disable the microphone icon in the recording, so you can easily indicate when you’re speaking.
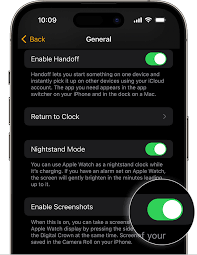
Lastly, you can also toggle on or off the option to show touches on the screen, which can be helpful when you want to highlight specific actions or gestures.
By customizing these settings, you can ensure your screen recordings are exactly how you want them to be.
Starting and Stopping a Screen Recording
Get ready to dive into the world of screen recording on your iPhone by learning how to effortlessly start and stop your recordings.
Starting a screen recording on your iPhone 13 is a breeze. Simply swipe down from the top right corner of your screen to access the Control Center. Look for the screen recording button, which resembles a solid circle inside a larger hollow circle. Tap on it, and a countdown will appear, indicating that your screen recording is about to begin.
To stop the recording, tap the red status bar at the top of your screen, then select ‘Stop.’ Alternatively, you can also swipe up from the bottom of your screen and tap on the screen recording button again.
Now you’re ready to capture all your important moments with ease.
Editing and Sharing Your Recorded Content
Immerse yourself in the world of creativity as you transform and share your recorded masterpieces effortlessly. Once you’ve finished recording your screen on your iPhone 13, it’s time to unleash your editing skills and share your content with others.
Open the Photos app and locate your recorded video. Tap on it to open the video editing tools. Trim the beginning and end of your recording by dragging the yellow handles. If you want to add some flair, tap the ‘+’ button to access additional editing options like filters, text, and music. Personalize your video and make it truly unique.
When you’re satisfied with your edits, tap ‘Done’ and choose your preferred sharing method. You can send it via Messages, upload it to social media, or simply save it to your camera roll.
Let the world experience your creativity!
Tips and Tricks for a Seamless Screen Recording Experience
Enhance your screen recording journey with these expert tips and tricks for a smooth and effortless experience.
First, make sure to enable the microphone option if you want to record audio along with your screen. Simply swipe up from the bottom of your screen to access the Control Center, tap on the microphone icon, and ensure it’s turned on.
Secondly, if you want to highlight a specific area on your screen, use the magnifying glass feature. Just go to Settings > Accessibility > Display & Text Size > Magnifier and enable it. This way, you can easily zoom in and draw attention to important details.
Lastly, to save storage space, consider lowering the video quality. Go to Settings > Camera > Record Video and choose a lower resolution.
By following these tips, your screen recording experience will be seamless and convenient.
Frequently Asked Questions
Yes, you can screen record on your iPhone 13 without any third-party apps. The built-in screen recording feature allows you to capture your screen effortlessly by simply swiping down from the top right corner and tapping the record button.
A screen recording on iPhone 13 typically takes up around 1GB of storage space per 10 minutes of recording. So, if you record for 30 minutes, it would use approximately 3GB of storage.
Yes, you can screen record on your iPhone 13 while using other apps or during phone calls. This allows you to capture all your important moments without any interruptions or limitations.
Yes, it is possible to record the screen with audio on your iPhone 13. Simply go to Control Center, tap the Screen Recording button, and enable the microphone. This way, you can capture both video and audio simultaneously.
Yes, you can screen record in landscape mode on your iPhone 13. Simply rotate your device to landscape orientation before starting the screen recording, and it will capture everything in the landscape view.
Conclusion
So there you have it! Now you know how to screen record on your iPhone 13 and capture all your favorite moments with ease. By enabling screen recording, accessing the controls, adjusting settings, and starting and stopping a recording, you can create high-quality videos of your device’s screen.
Don’t forget to edit and share your recorded content to make it even more impressive. With these tips and tricks, you’ll have a seamless screen recording experience on your iPhone 13. Happy recording!